Pages

Showing posts with label toddler activities. Show all posts

Friday, August 8, 2014

Sidewalk Painting!

Summertime means lots of outdoor, often messy, fun when you have a toddler! Yesterday we tried a DIY idea that I have seen floating around Pinterest lately: sidewalk chalk paint. It's not an original idea by any means, but it was a success (as measured by Jacob's excitement!), so I want to share :)

Jacob LOVES to "do projects," which means to do anything that he sees Mommy & Daddy (especially Daddy) doing around the house. Painting is one of those things; we've painted several items lately, and he was SO excited to paint!

First, you need to make your chalk paint. There are many tutorials online for this (I like this one), but it's super easy. Basically, take some old sidewalk chalk, crush it up into a powder, add water, and stir. That's it. Chalk paint! They do sell chalk paint powder in containers resembling paint cans, but it's so easy and cheap to make it yourself, especially if you already have old, broken chalk pieces; I decided to save a few bucks on the paint and get Jacob some other supplies.

I will say that I didn't do the best job crushing it into a fine powder (I put the chalk in a plastic bag and pounded it with a meat tenderizer mallet -- a hammer might be better). Tiny lumps aren't a big deal, but our paint was a bit lumpier than I would have liked. Jacob didn't notice, though!

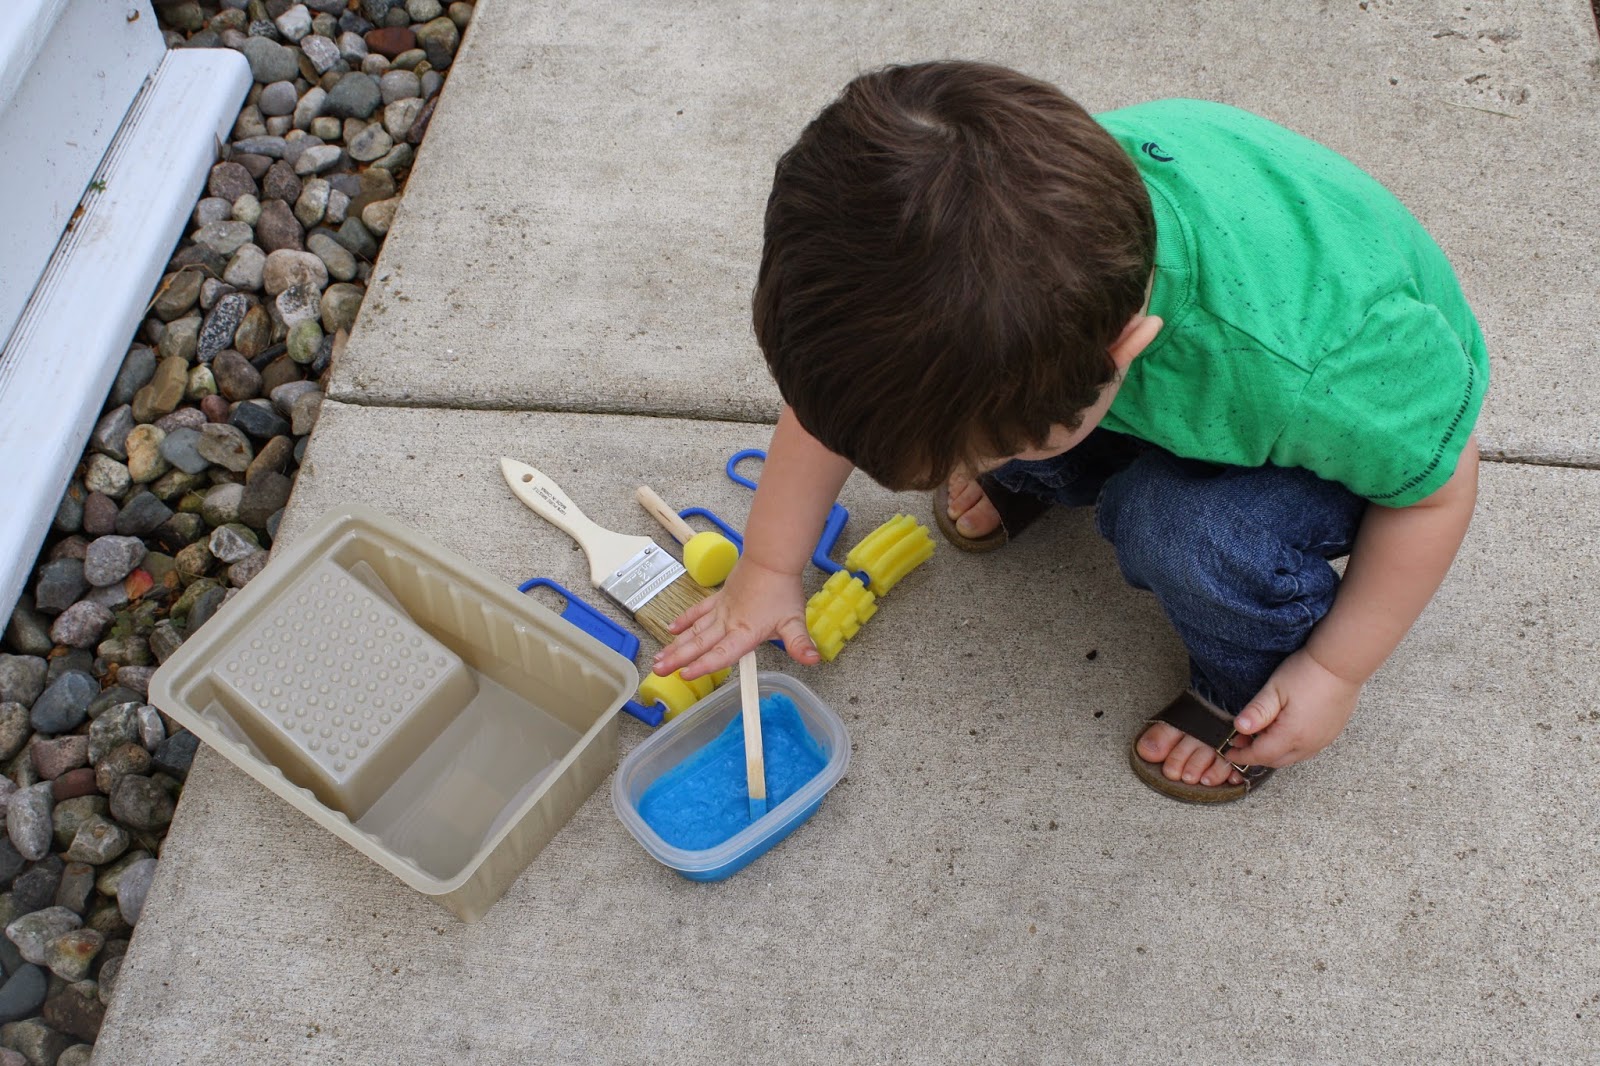
All ready to get started! I picked up the mini paint pan, brush, and set of textured rollers at Walmart for about $3.50 total, so that he could feel like a real painter! The pan and brush were with the painting supplies, and the rollers were in the kids' art supply aisle. I already had the little stencil sponge brush, which turned out to be perfect for making polka dots!
helping to stir the paint 
...and he's off! The textured rollers were really fun; he loved making "tracks."
You could always just use a plastic bowl and regular art brushes for this, but the paint pan and rollers were a huge hit with him because he felt like a grown up -- I highly recommend some "real" painting tools :) Later, after I washed everything, he used the dry rollers to "paint" the siding and windows of the house," so they were great for pretend, too! Additionally, you could put plain water in the paint pan and let kids "paint" with water. I plan to try this sometime when we don't have the time or energy for the chalk mess, as I imagine the textured sponge rollers will still make tracks with plain water.
"Stamping dots" was really fun.
"Look mom, blue hands!" Of course he had to paint himself, too ;) 
This activity was a bit messier than I expected (although I was naive to expect anything different with this boy!), so it may be smart to have your kids wear old clothes and washable shoes or bare feet ;) The good news is that chalk washes off pretty easily!

Thursday, April 17, 2014

A Family-friendly AND Christ-friendly Easter

Happy Easter (a few days early)!

It's Holy Week, a very important time in the Christian calendar, and one of my favorite holidays! Let's take a moment to celebrate the Good News we will hear on Sunday -- Christ is Risen!

I wanted to share the ways we've decorated and celebrated around our house and hopefully give you a few ideas for sharing the Easter story with young children. And, I'm offering my Easter chalkboard printable for only $1 on my Etsy shop this week! Scroll to the last image and click the link to go get yours now!

I think you can focus on Christ at Easter and still decorate with cute, secular seasonal decor.
Especially if you have a two-year-old!
It's great to get the kids involved with decorating and celebrating, and working on something together provides a nice time to explain the reason behind the holiday! Jacob is only two, so we stuck with a couple of pretty simple crafts this year -- coloring this bunny and dyeing some eggs.
I mixed religious and more secular decor, and I think it's a sweet and festive mantle :)
Use your Palm Sunday palms as decoration! And explain the Palm Sunday story to the children, while you're at it. Jacob enjoyed waving the palms at church on Sunday, and later I made a cross out of one (which I learned how to do as a child and still do every year). This was a good visual for him, and he now knows that a cross means "Jesus loves me!"
I used my own printable chalkboard art, and I hope you will, too :)
We created a centerpiece with some speckled eggs I already had and the eggs Jacob dyed. I bough the "Plastic Decorating Eggs" from Walmart, and they turned out very pastel, but I think that's pretty. I thought we'd try plastic ones this year, so he couldn't smoosh and break them, and also because these were his first Easter eggs, and I thought I may want to save some as keepsakes ;) The Peter Rabbit napkins are left from my baby shower over two years ago, and I thought this was the perfect time to use them, since Jacob loves Peter lately. And of course, you must have jelly beans!
And here's the digital image of my printable sign! Please visit my shop and download it for only ONE dollar, and share the Good News that Christ is Risen indeed! Thank you :)

Friday, March 21, 2014

Very Hungry Caterpillar Day

Yesterday (March 20th) was national "The Very Hungry Caterpillar Day," in celebration of the 45th anniversary of Eric Carle's beloved children's story.

We adore the book and the artwork (even used it as the theme for Jacob's first birthday party), so when I heard about the special day and saw that schools, libraries, and Carle-lovers everywhere were planning activities to celebrate, I thought we should join in and have our own Caterpillar Day! Jacob already seems to enjoy crafts and themed-activities (I'm rubbing off on him), so he had a great time.

I want to share what we did, in case you or your child love this story, too! These activities are geared toward toddlers (probably around 18 months - 4) and would be fun on any day, not just Caterpillar Day, so pick one or do them all -- maybe even incorporate them into your own birthday party plan?

We started the morning with some cuddles and reading time (the story itself and also his plush caterpillar "book" that just has simple images and key words). I read the story aloud and then had Jacob name and count items from the book. We also discussed items' colors and really lingered on the Saturday page (with all the food), as he loves to point out the pickle, the chocolate cake, etc.

Then we went about our normal morning routine -- playing, getting ready, and such -- and resumed Caterpillar Day at lunch time with this little surprise on his plate:


I made the caterpillar out of half a grape tomato, pickle slices (skin cut off), and shreds of cheese. Cucumbers would be a prettier (and healthier) option, but I knew Jacob wouldn't eat those, and green grapes would be healthy and cute but are a choking hazard for toddlers. He loves pickles, just like mommy, so it worked :)

I prepped the craft supplies while Jacob ate and played and talked to him about what we were going to be making later (but waited till after his nap, so that he was refreshed and happy). After he woke up, we did these little projects:

1. Color, Cut & Paste Caterpillar:


Supplies:
- free printable templates, found here
- background paper or card stock
- crayons
- scissors & tape or glue

Steps:

Have your child color the caterpillar pages! They can scribble to their heart's content and even add stickers or glitter if you want. Jacob said he was done after some pretty basic two-year-old scribbling, but that was okay with me :)


Cut out the pieces. An older child may be able to do this (with child scissors), but I needed to do this step for Jacob. I handed him each piece as I cut them, so he played with them and attempted to put them together like a puzzle. 

Tape or glue the pieces onto the background paper. It helps to start with the last one (back end of the caterpillar) first. Again, since he's only (almost) two, I put the tape on and showed him where to put each piece, so that it would end up actually looking like a caterpillar! He enjoyed sticking each piece down and saying "bam" ;)  He was proud of the finished product, and I wrote his name and the occasion on the green paper (see above).
2. Caterpillar Necklace:

I found this on Pinterest, and the original tutorial for this adorable necklace can be found here.


Supplies:
- yarn or string
- construction paper or card stock (ideally in red, green, yellow, and orange (or purple)
- tubular pasta noodles (penne, rigatoni, etc.)
- white vinegar
- green food coloring
- scissors, hole punch, & glue

Steps:

Gather your materials and dye the noodle beads (I used this tutorial because I hadn't dyed noodles before and the original necklace tutorial called for rubbing alcohol. I didn't have any and also wanted to use something safer! Using vinegar and food coloring is very quick and easy -- just allow a couple of hours of drying time before stringing the beads.) Scrap paper works great for this because you need very small amounts of paper; I just happened to have the green polka-dot scrap and thought it would be cute to include.


Make the caterpillar's face and body. An older child definitely could help much more with this part! I just pre-cut the circles (about 1") and made the little face (to match the book) while Jacob was napping. Punch a hole in each piece. 


The fun part! Have your child string the "beads." Start with the last body circle and work your way backwards to the head, putting a noodle in between each paper circle. Jacob struggled a bit with the stringing at his age, so I got each piece started and had him pull the yarn all the way through -- he still thought it was great! Tie knots at the head and tail after stringing, so that the caterpillar stays centered on the necklace. 


Admiring his work!


Since he enjoyed the stringing and struggled with the yarn, I grabbed a pipe cleaner and let him practice more "stringing" for a while on that. You could easily adapt this craft for toddlers and just make a pipe cleaner caterpillar instead of a necklace! 

There are tons of other cute activities out there, but a toddler can only do so much in one day! I just did a Google search and also browed Pinterest for TVHC craft ideas, and these two seemed both age appropriate and easy to do with items we already had. They both went over very well! Mom and toddler approved :)